4.0.0 and greater
What is the Jira Hooks for Bitbucket Plugin?
Jira Hooks for Bitbucket supports Commit checks, push checks and merge checks
Jira Hooks for Bitbucket connects Jira and Bitbucket Cloud to help teams enforce compliance requirements and maintain a clear audit trail across their development workflow.
The plugin validates the relationship between branches, pull requests, commits, and their related Jira issues before changes can move forward. This helps ensure that development activity stays aligned with defined process rules and that every change remains traceable to the correct work item.
In many environments, a merge should only proceed when the related Jira issue meets specific requirements. These requirements can include issue status, mandatory fields, approvals, fix versions, or other workflow conditions. By enforcing these checks directly in Bitbucket, the plugin helps teams reduce process gaps, improve governance, and support consistent delivery standards.
At the core of the add-on is the Process Guardian, a configurable rule engine that validates pull requests, commits, and pushes against defined compliance rules. It can evaluate requirements before a merge takes place, during pull request review, or through local commit and push validation using the Validation API. These checks strengthen process control, improve traceability, and create a more reliable foundation for compliance, governance, and auditable delivery workflows.

Jira Hooks for Bitbucket Cloud is free of charge until at least August 2027.
This period may be extended if needed, depending on the availability of Atlassian Marketplace integration and product development progress.
After this period, and at the latest once Atlassian has fully enabled Marketplace integration for this app, a pricing model will be introduced and usage may become subject to fees.
Please note: Once the free period ends, the product may no longer be fully functional or may only be partially available until a valid license or subscription is in place.
We will provide early notice and transparent communication before any pricing changes take effect.
General structure of the rule engine
A core element of the structure in Jira Hooks for Bitbucket is the concept of a rule. Rules help teams enforce compliance requirements through configurable policies. Each rule represents a specific policy that the system evaluates during key actions in the development workflow.
At a high level, a rule defines what the system checks, when the check runs, and under which conditions it applies. This structure makes it possible to model different compliance scenarios in a consistent and transparent way.
Core Building Blocks
A rule consists of 4 main components.
-
Trigger: The trigger defines the event that starts the rule evaluation. A common example is a pull request. When a rule uses this trigger, the system evaluates the rule whenever a pull request reaches a point where compliance validation is required.
-
Target: A target represents a specific location within the development workflow, such as a commit message, a branch name, a pull request title, or a pull request description. When a rule is evaluated, the selected checks are executed against all configured targets.
-
Checks: Checks perform the actual validation. A rule can include one or several checks, depending on the compliance scenario. Each check verifies a specific requirement that supports process control, traceability, and auditability. (e.g. Issue key check)
-
Conditions: Conditions define when a rule applies. They work as a filter before any validation begins. For example, conditions can limit a rule to specific source branches, target branches, or other contextual criteria. The system only evaluates a rule if the selected trigger fires and all defined conditions match.
From a high-level perspective, the rule engine combines events (triggers), validation targets (targets), applicability logic (conditions), and validation logic (checks) into flexible rules that enable automated enforcement of compliance requirements in Bitbucket workflows.
The Process Guardian
At the center of this model is the Process Guardian. The Process Guardian is a conceptual actor within the system that executes the configured rules for a specific trigger. You can think of it as an artificial gatekeeper that reviews development actions step by step and decides whether they meet the defined compliance requirements.
For example, when a pull request reaches a validation point, the Process Guardian reviews it against all applicable rules. It evaluates the conditions, executes the checks, and determines whether the pull request is compliant or non-compliant.
The compliance workflow
When rules are configuered, they directly influence how actions in the development workflow are handled. As soon as rules are active in a repository, validation is enabled.
Events
Validation starts when Bitbucket emits an event. An event is the technical signal that tells the Process Guardian that a workflow action must be evaluated. Typical examples are actions around a pull request, such as viewing or merging it.
When such an event occurs, the Process Guardian retrieves all rules that are configured with a matching trigger. Only those rules are included in the evaluation for the current event. This ensures that the system evaluates only the rules that are relevant for the specific workflow action.
For example, when Bitbucket emits a pull request event, the Process Guardian loads all rules that are assigned to the pull request trigger. It then evaluates the conditions and checks of these rules and builds the final validation result.
How rule evaluation works
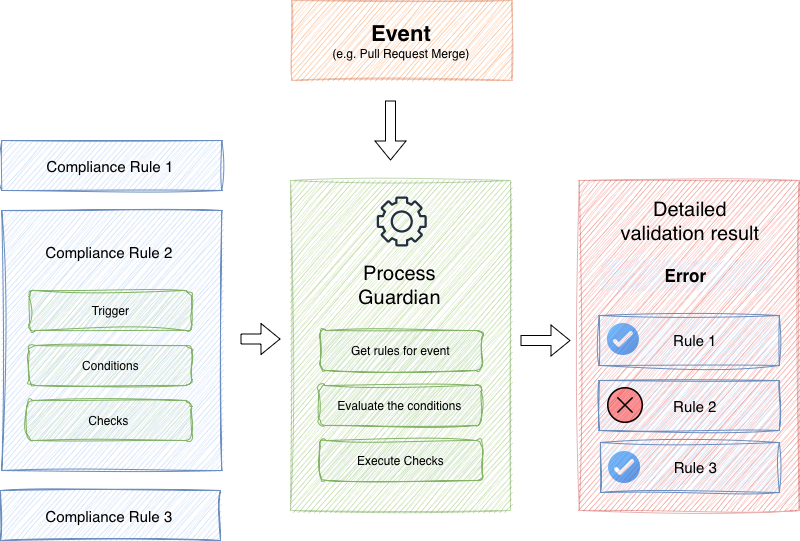
The evaluation flow follows the structure shown in the diagram.
-
An event occurs, for example a pull request merge, Push or Commit
-
The Process Guardian is activated for this event
-
The Process Guardian gets all rules that belong to the event
-
For each relevant rule, the Process Guardian evaluates the configured conditions
-
If the conditions match, the Process Guardian executes the configured checks
-
The Process Guardian consolidates the results of all evaluated rules into a detailed validation result
-
The final result contains the outcome for each rule and an overall result, for example an error if one or more required rules fail
-
Based on this final result, the Process Guardian approves or rejects the pull request and allows or blocks the requested action
This sequence ensures that compliance validation happens in a structured and repeatable way.
Why this matters
This model separates policy definition from policy enforcement:
-
Rules define what compliance means
-
The Process Guardian ensures that these rules are applied
This separation improves flexibility, strengthens governance, and creates a reliable audit trail for every evaluated action.
Evaluation result
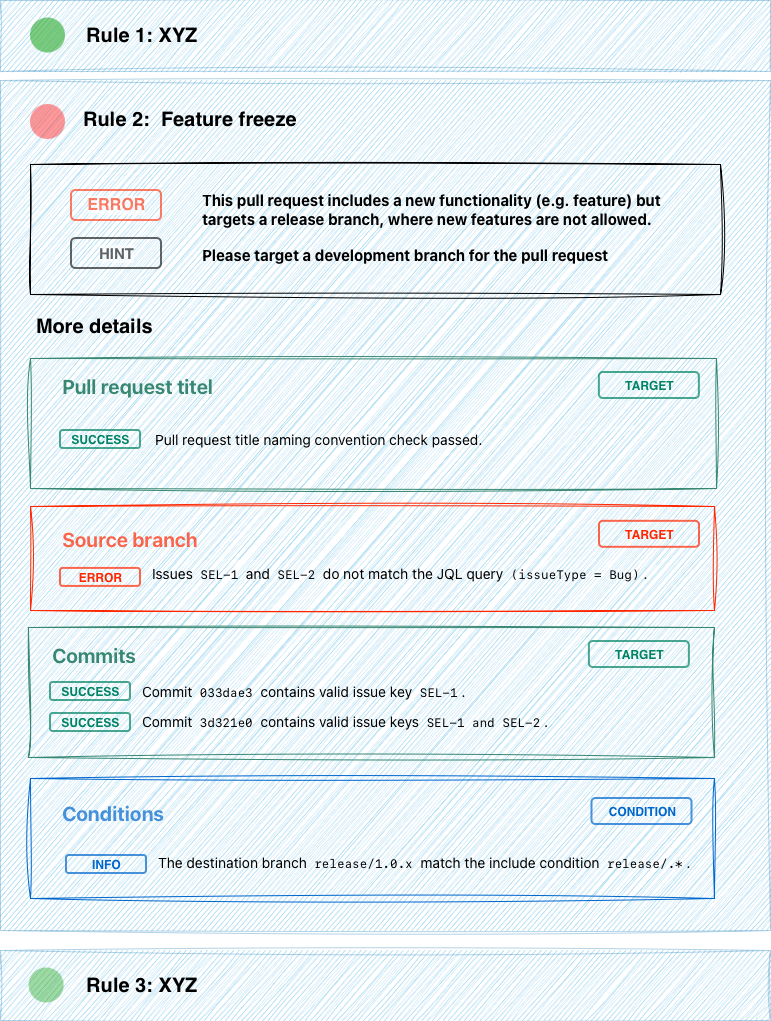
The evaluation result provides a structured top-down view of all relevant validation information.
At the first level, users can see all rules and whether each rule was successful or not successful. This level primarily shows the general rule information, such as the rule title, together with the overall status of each rule.
In addition to the rule-level result, the evaluation also collects more detailed information. For each rule, all associated checks are listed together with their individual status.
Each check includes:
-
the check name, which identifies the specific validation that was executed within the rule
-
the status, which shows whether the check was successful or not successful
-
the details, which provide the concrete validation result and explain why the check passed or failed, for example which requirement was fulfilled, which condition was not met, or which input caused the validation to fail
This structure makes it possible to first understand the overall result of a rule and then drill down into the detailed validation outcome of each individual check.
Audit Trail
A particularly important aspect is that this information is not only used to explain why an action, such as a merge, is allowed or not allowed. The evaluation result is also stored permanently on a merged pull request. From a compliance perspective, this is a key benefit because it creates a durable merge record that remains available as part of the audit trail.
This means that even after a pull request has already been merged, users can still access the stored evaluation result and understand why the integration was permitted at that point in time. In this way, the evaluation result serves not only as immediate validation feedback, but also as a permanent merge protocol for later review and audit purposes.
Persistence
Every merged pull request contains a persisted, auditable validation record that explains exactly why the merge was allowed.
Next steps
-
Install the add-on: Install the Jira Hooks for Bitbucket add-on in your workspace to enable rule-based validation.
-
Configure the Process Guardian: Define the global behavior of the Process Guardian, such as issue key detection, validation mode, and review behavior.
-
Configure the Jira connections: Set up the connection to Jira using a technical user and a personal API token to enable issue validation and JQL-based checks.
-
Create rules: Define your compliance requirements by creating rules. Start with the Templates section to reuse proven configurations and adapt them to your needs.
-
Validate your first Pull Request: Create or open a pull request and see how the configured rules affect pull request validation, reviews, approvals, change requests, and merge decisions throughout the pull request lifecycle.
-
Setup local Git hooks (optional): Enable local commit and push validation by integrating the Validation API into Git hooks, CI/CD pipelines, or other automation workflows.
Advanced
If you prefer configuration as code, you can define and manage your rules directly in the repository using YAML. This allows versioning, review, and branch-specific rule configurations.
LET’S GO
Start validating your pull requests and ensure compliance across your development workflow.